Securely Connect Remote IoT Devices: P2P SSH On Ubuntu
Many of us have been there, you know, facing a message that says your connection isn't trusted, or maybe your device feels a bit at risk because it's just not up to date. It’s a pretty common worry, especially when you are trying to reach something important from afar. That feeling of not being sure if your digital link is truly safe can be a real headache, and it's something a lot of people think about, particularly with more and more gadgets needing to talk to each other.
When you have small, smart devices scattered around, perhaps in your home, a workshop, or even out in the field, getting to them to check things or fix something can be a real challenge. You might worry about who else could be listening in or if someone could sneak onto your system. It's a big deal to keep those connections private and sound, so your information stays yours and your devices do what they are supposed to do, without any unexpected visitors. We need ways to make sure those remote links are not just working, but are also truly protected.
This article will help you understand how to make those far-off connections truly safe, using a clever way to link up your small, smart devices running Ubuntu. We will talk about peer-to-peer (P2P) SSH, which is a method that lets your devices talk directly to each other, almost like they are right next door, even when they are miles apart. It's a rather straightforward path to making sure your remote IoT setup is as locked down as it can be, so you can manage your things with peace of mind, you know?
- Who Is Emily Compagno Married To
- Rob Zombie
- Uncut Webseries Download
- Xev Bellringer
- Sophie Rain Spiderman Erome
Table of Contents
- Why Secure Remote Access Matters for IoT
- Ubuntu: A Smart Choice for Your IoT Devices
- Getting to Know P2P SSH for IoT
- Setting Up Your Ubuntu IoT Device for SSH
- Making P2P Connections Happen with SSH
- Keeping Your IoT SSH Connections Safe
- Common Connection Issues and How to Fix Them
- Frequently Asked Questions (FAQs)
- Bringing It All Together
Why Secure Remote Access Matters for IoT
Think about all the little smart devices that are becoming a part of our daily routines. We have smart thermostats, security cameras, industrial sensors, and even smart agriculture tools, so it's a very big change. These devices often sit far away from where you are, maybe even in another building or across town. Getting to them to check their status, update their software, or troubleshoot a problem is pretty important. If you can't reach them, or if the way you reach them isn't safe, then you might have some real problems.
A big worry for anyone dealing with these kinds of gadgets is making sure no one else can get in. If a connection isn't trusted, or if there are holes in the security, then your private information, or even the control of your devices, could fall into the wrong hands. This is why having a truly secure way to talk to your remote IoT things is not just a nice idea, but something you really need to have. It helps keep everything running smoothly and keeps your data safe, too it's almost a must-have.
- Kid And His Mom Cctv Video Porn
- Lol Superman Link
- Xxxe
- Bitchesgirls Paige Vanzant
- 9xmovies Downloadhub Full Movie Download
You know, issues like outdated software or missing security updates can make any device a target, and IoT gadgets are no different. Just like how you might get a warning that your computer is at risk because it's not current, the same goes for these smaller systems. Using a method like P2P SSH helps you keep those devices updated and protected, even when they are not physically close to you. It's about being proactive and making sure you are always on top of things, so.
Ubuntu: A Smart Choice for Your IoT Devices
When you pick an operating system for your IoT devices, you really want something that is both flexible and strong. Ubuntu, especially its versions made for smaller devices like Ubuntu Core or Ubuntu Server, is a very popular option, you know. It gives you a solid foundation that is known for its stability and how well it works with different kinds of hardware. Plus, there is a huge community of people who use it, so finding help or resources is usually pretty easy.
One of the best things about Ubuntu for IoT is its focus on security. It gets regular updates, which means those important security patches are usually available quickly. This helps keep your devices safe from new threats, which is a big deal when you are trying to avoid those "device at risk" warnings. It also has many built-in tools that help you manage permissions and keep your system locked down, so it's quite useful.
Ubuntu also makes it simpler to install and run many of the programs you might need for your IoT projects, including the tools for secure remote access like SSH. Its package management system is very straightforward, which means getting your device ready to connect securely is not a huge task. For someone looking to build a reliable and protected IoT setup, Ubuntu offers a really good starting point, that is for sure.
Getting to Know P2P SSH for IoT
SSH, or Secure Shell, is a well-known way to get into a computer or server from a distance, and it does this in a very safe way. It sets up an encrypted path between your computer and the device you want to reach, so everything you send back and forth stays private. For IoT devices, this means you can send commands, transfer files, or check logs without worrying about someone else seeing your information. It's a standard tool for remote management, and it works very well.
Now, when we talk about "P2P SSH," we are really talking about how you can make two devices connect directly to each other, even if they are behind different network setups. Usually, when you SSH into a device, that device needs to have a public IP address, or you need to set up something complicated like port forwarding on your router. But with IoT devices, they are often on private networks, and getting them a public IP or changing router settings can be a real pain, or sometimes even impossible.
P2P SSH aims to solve this problem by allowing devices to find and talk to each other without needing those tricky network configurations. It's about creating a direct link, peer to peer, which can be much more efficient and sometimes more secure because the connection path is simpler. This method helps you avoid those frustrating messages about untrusted connections or problems linking up securely to a website, but applied to your own hardware.
How P2P SSH Helps with NAT and Firewalls
Many IoT devices live behind something called Network Address Translation (NAT) or firewalls. These are like guards at the entrance of a private network, protecting the devices inside. While they are good for security, they make it really hard for an outside computer to start a connection with a device inside. It's like trying to call someone who only has an internal extension number in a big office building; you can't just dial their extension directly from the outside, you know?
P2P SSH solutions often use clever ways to "punch through" these barriers. One common method involves a third, publicly accessible server that acts as a temporary meeting point. Both your computer and the remote IoT device can connect out to this meeting point, and then the meeting point helps them establish a direct connection to each other. This is often called "NAT traversal." It means your devices can find each other and start a secure SSH session without you having to mess with complex router settings for each device, which is rather convenient.
This approach helps overcome those common "problem connecting securely to this website" kinds of issues, but for your hardware. It means you can manage your devices from anywhere, without needing a fixed public IP address for each one, which is a big plus for IoT setups. It makes remote access much more practical and less of a headache, so you can focus on what your devices are doing, not how to reach them.
Setting Up Your Ubuntu IoT Device for SSH
Getting your Ubuntu-powered IoT device ready for SSH access is a pretty important first step. This process makes sure your device can listen for incoming SSH connections and that you have a way to prove who you are when you try to connect. It's not too complicated, but it does need a few specific actions to make sure everything is set up correctly and safely.
Initial Ubuntu Setup
First off, make sure your Ubuntu IoT device is up and running. If you are using something like a Raspberry Pi with Ubuntu Server or Ubuntu Core, you would have already flashed the operating system onto an SD card or eMMC storage. Once it boots up, you should connect it to your local network, perhaps with an Ethernet cable or by setting up Wi-Fi. It's a good idea to update the system right away, too, just like you would with any other computer. You can do this by opening a terminal and typing `sudo apt update` followed by `sudo apt upgrade -y`. This helps keep your device from being "out of date and missing important security and quality updates," you know?
After the updates, you should create a new user account for yourself if you are not already logged in with a non-root user. Running things as the 'root' user all the time can be a bit risky. You can add a new user with `sudo adduser yourusername` and then give that user administrative powers with `sudo usermod -aG sudo yourusername`. This makes sure you are not always operating with the highest level of access, which is a good security practice, basically.
Installing and Configuring SSH
Most Ubuntu Server and Core installations come with SSH pre-installed, but if yours doesn't, it's easy to add. Just run `sudo apt install openssh-server -y`. Once it's installed, the SSH service usually starts on its own. You can check if it's running with `sudo systemctl status ssh`. If it's not active, you can start it with `sudo systemctl start ssh` and make sure it starts automatically when the device boots up using `sudo systemctl enable ssh`.
Next, you might want to make a few small changes to the SSH configuration file to make it more secure. This file is usually located at `/etc/ssh/sshd_config`. You should open it with a text editor, like `sudo nano /etc/ssh/sshd_config`. Inside, look for lines like `PermitRootLogin yes` and change it to `PermitRootLogin no`. This stops anyone from trying to log in directly as the 'root' user. You should also consider changing the default SSH port from 22 to something else, like `Port 2222`. This is a small step that can help deter some automated attacks, so it's a good idea. After making changes, remember to restart the SSH service with `sudo systemctl restart ssh` for them to take effect.
Setting Up SSH Key Authentication
Using passwords for SSH can be a bit weak, honestly. A much safer way to connect is with SSH keys. This involves having two parts: a private key on your computer (which you keep secret) and a public key on the IoT device. When you try to connect, the device checks if your public key matches your private key, and if it does, you are let in without needing a password. It's a much more secure method and helps avoid "security certificate problems," but for your login.
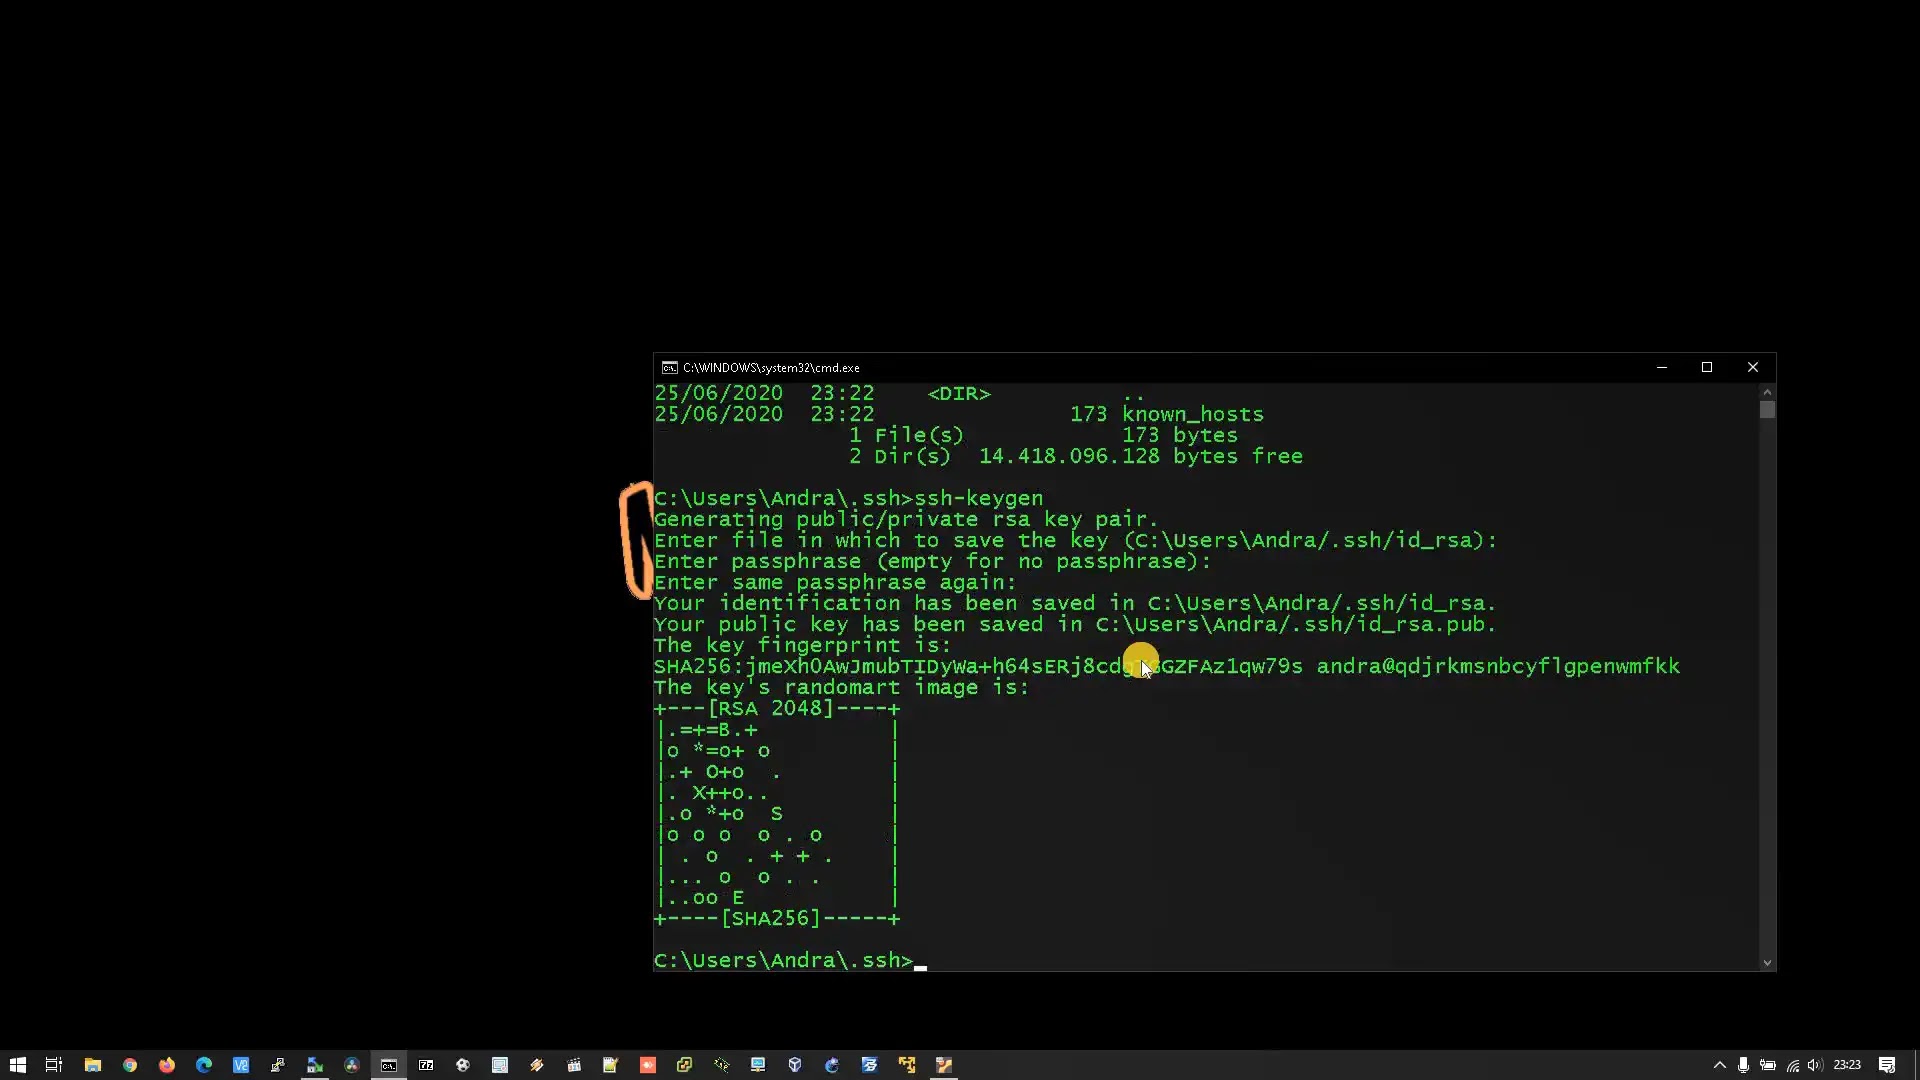
On your local computer, you would generate a key pair using `ssh-keygen`. This creates two files, usually `id_rsa` (private) and `id_rsa.pub` (public). Then, you need to copy the public key to your IoT device. The easiest way to do this is with `ssh-copy-id yourusername@your_iot_device_ip`. If that doesn't work, you can manually copy the content of your `id_rsa.pub` file into a file named `authorized_keys` inside the `.ssh` folder of your user's home directory on the IoT device (`~/.ssh/authorized_keys`). Make sure the permissions on the `.ssh` folder are `700` and on `authorized_keys` are `600` (`chmod 700 ~/.ssh` and `chmod 600 ~/.ssh/authorized_keys`).
Once you have set up key authentication, you should go back to the `/etc/ssh/sshd_config` file on your IoT device and change `PasswordAuthentication yes` to `PasswordAuthentication no`. This makes sure that only people with the correct SSH key can get in, which is a really strong security measure. Remember to restart the SSH service after this change. This approach is much more resilient against brute-force attacks than just relying on passwords, so it's very important.
Making P2P Connections Happen with SSH
The core idea behind P2P SSH for remote IoT is to get around the common hurdles of network setup, like NAT and firewalls, that prevent direct connections. Since most IoT devices are on private networks, they can't simply be reached by their IP address from the outside world. This is where clever solutions come into play, allowing your remote device to initiate a connection outwards, and then allowing you to "piggyback" on that connection to get in. It's a bit like two people wanting to talk but being in separate locked rooms; they both call a third person, who then connects their calls, you know?
Using a Relay Server or VPN for P2P SSH
One common and effective way to achieve P2P-like access is by using a small, publicly accessible server as a "relay." Both your local computer and your remote IoT device connect to this relay server. Your IoT device can establish a reverse SSH tunnel to the relay, which means it opens a port on the relay server that forwards traffic back to its own SSH service. Then, you can SSH into that specific port on the relay server, and it will effectively connect you directly to your IoT device, even though the IoT device is behind a NAT. This method creates a secure, direct path without needing port forwarding on the IoT device's local network. It's a pretty neat trick, honestly.
Another strong option is to use a Virtual Private Network (VPN). You can set up a VPN server on a cloud instance or a home server with a public IP, and then configure both your local computer and your IoT devices to connect to this VPN. Once they are all on the same VPN network, they act as if they are on the same local network, allowing for direct SSH connections. This provides an extra layer of security, as all traffic within the VPN is encrypted. Solutions like WireGuard or OpenVPN are very good for this, and they are widely used. This helps avoid "this connection is untrusted" warnings because all traffic is within your secure, private network.
Tools for NAT Traversal
Beyond manual reverse SSH tunnels or full VPNs, there are specialized tools designed to simplify NAT traversal for remote access. These tools often handle the complex parts of establishing peer-to-peer connections. For instance, services like ZeroTier or Tailscale create virtual networks that allow devices to connect directly to each other, regardless of their physical network location or NAT settings. They essentially create a software-defined network that spans across the internet, making all connected devices appear as if they are on the same local network. This makes setting up P2P SSH much, much simpler, you know?
These tools typically involve installing a client on both your local machine and your Ubuntu IoT device. Once installed and configured, they handle the discovery and connection process, allowing you to use standard SSH commands as if your IoT device was right next to you. This is a particularly helpful approach for those who find setting up manual reverse tunnels or full VPNs a bit too involved. It streamlines the process significantly, letting you focus more on managing your IoT applications and less on network plumbing. Learn more about secure network configurations on our site, and link to this page for advanced IoT management techniques.
Keeping Your IoT SSH Connections Safe
Setting up secure P2P SSH is a great start, but keeping your remote IoT connections safe is an ongoing task. It's not just a one-time setup; it needs continuous attention to protect against new threats and make sure your system stays locked down. Think of it like keeping your home secure; you don't just lock the doors once and forget about it, do you? You check them, you update your locks, and you stay aware of your surroundings, so.
Regular Updates and Patches
This is probably one of the most important things you can do. Just like the warning about your device being "out of date and missing important security and quality updates," your IoT devices also need regular attention. Software updates often include fixes for security holes that attackers could use to get into your system. Make it a habit to regularly run `sudo apt update` and `sudo apt upgrade -y` on your Ubuntu IoT devices. You might even set up automated updates if your deployment allows for it, which is a really smart move. Keeping things current helps prevent many common security problems, honestly.
Strong Passwords and Key Management
While SSH keys are much safer than passwords, you still need to protect your private SSH keys on your local machine. Make sure your private key file has very strict permissions (only readable by you). Also, always use a strong passphrase for your SSH key when you generate it. This adds another layer of protection, so even if someone gets their hands on your private key file, they still need the passphrase to use it. Regularly review your SSH keys and consider rotating them every so often, just to be on the safe side. This is similar to regenerating encryption keys, as mentioned in "My text," but applied to your SSH setup, you know?
Firewall Rules on Your IoT Device
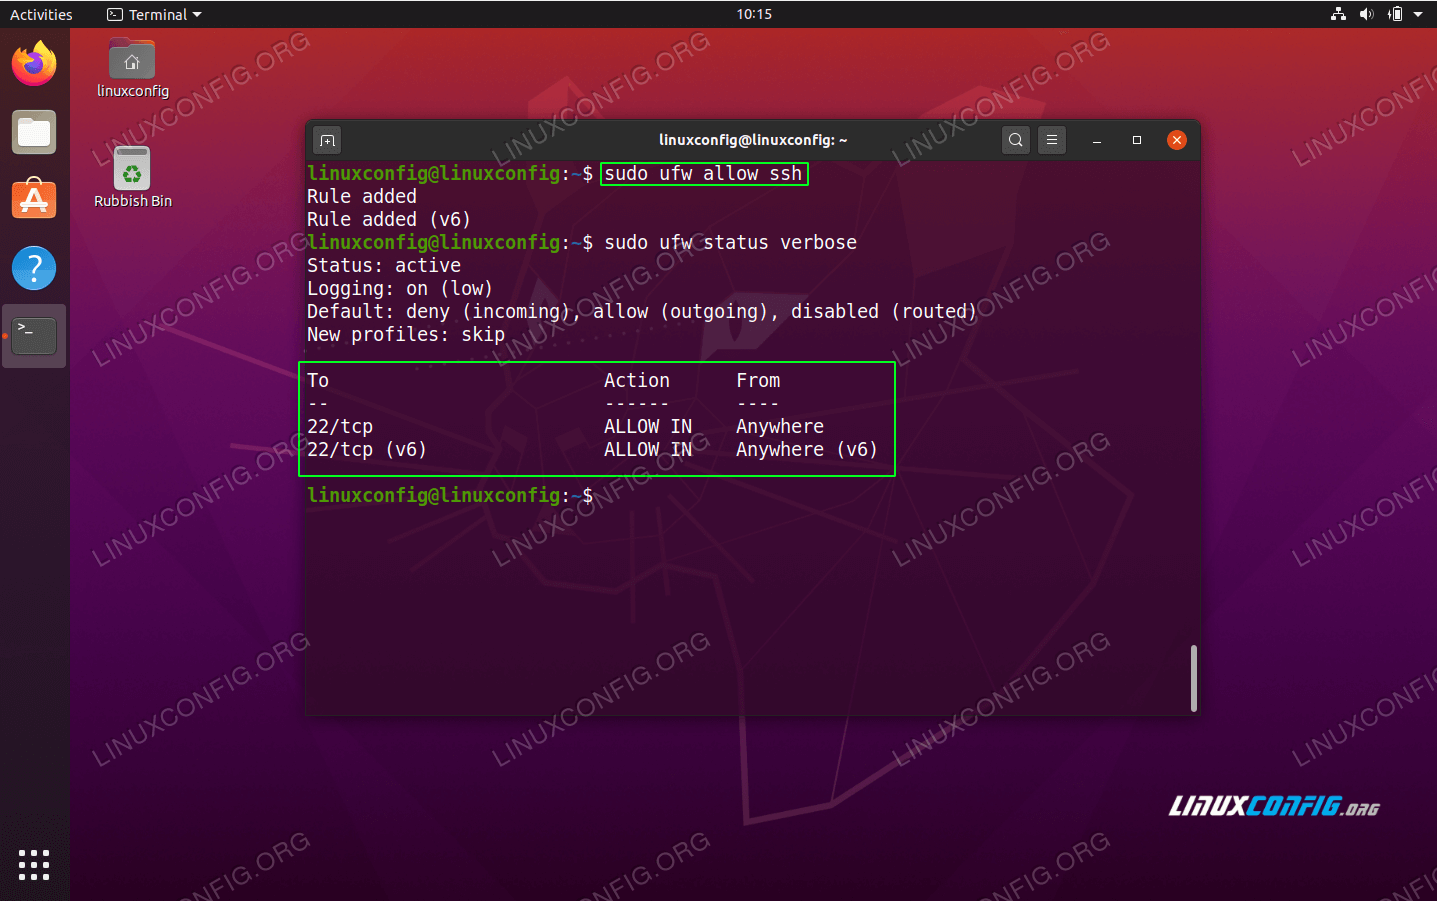
Even with P2P SSH, it's a good idea to have a firewall running on your Ubuntu IoT device. Ubuntu uses UFW (Uncomplicated Firewall) by default, which is pretty easy to set up. You can allow only incoming SSH connections from specific IP addresses (if you are using a relay server with a fixed IP) or only from your VPN network. For example, `sudo ufw allow ssh from 192.168.1.0/24` would allow SSH only from your local network. If you changed the SSH port, remember to allow that specific port instead of the default port 22. A firewall adds another layer of defense, blocking unwanted access attempts before they even reach your SSH service. It's a basic but very effective security tool, basically.
Monitoring and Logging
Keeping an eye on your device's activity logs can give you early warnings about potential problems. SSH logs, typically found in `/var/log/auth.log` on Ubuntu, show every login attempt, successful or not. Regularly checking these logs can help you spot unusual activity, like repeated failed login attempts from unknown sources. Setting up some form of automated monitoring or alerts for suspicious patterns in these logs can be a really good idea for larger deployments. This helps you react quickly if there is any sign of an "untrusted connection" trying to get in, you know?
Common Connection Issues and How to Fix Them
Even with the best setup, sometimes things just don't connect. It's like when you get a message saying "There is a problem connecting securely to this website" – it can be frustrating. For SSH connections to your IoT device, a few common problems pop up, but usually, they have straightforward fixes. Knowing what to look for can save you a lot of time and effort, you know?
One common issue is the SSH service not running on your IoT device. You can check this with `sudo systemctl status ssh` on the device itself. If it's not active, try `sudo systemctl start ssh`. Another problem might be firewall rules blocking the connection. Double-check your UFW rules on the IoT device to make sure the SSH port (default 22, or whatever you changed it to) is open to the IP address or network you are connecting from. You might temporarily disable the firewall with `sudo ufw disable` to test if that's the issue, but remember to re-enable it quickly with `sudo ufw enable`.
Key authentication problems are also pretty frequent. Make sure your public key is correctly placed in `~/.ssh/authorized_keys` on the IoT device, and that the permissions are set correctly (`chmod 700 ~/.ssh` and `chmod 600 ~/.ssh/authorized_keys`). If you are using a passphrase for your private key, make sure you are typing it correctly. Sometimes, the problem is simply that the IoT device doesn't have network access, so it's a good idea to ping a known website like `ping google.com` from the device to confirm it's online. If you are relying on a relay server or VPN, ensure both your local machine and the IoT device are properly connected to it. These steps usually help get you back on track, so you can connect more securely.
Frequently Asked Questions (FAQs)
Here are some common questions people ask about securely connecting remote IoT devices with P2P SSH on Ubuntu:
How do I securely access my IoT device remotely?
You can securely access your IoT device remotely by setting up SSH on the device and using SSH key authentication instead of passwords. For devices behind NAT or firewalls, you can use techniques like reverse SSH tunnels through a relay server, or by setting up a Virtual Private Network (VPN) that both your local machine and the IoT device connect to. Tools like ZeroTier or Tailscale can also help create virtual networks for direct peer-to-peer connections, which is pretty handy.
What is P2P SSH and how does it work for IoT?
P2P SSH refers to establishing a direct SSH connection between your local computer and a remote IoT device, even when they are on different private networks. It works by using methods to bypass network barriers like NAT. Often, this involves a third, publicly accessible server that acts as a meeting point, or specialized software that creates a virtual network. This allows the devices to find each other and establish a secure,
- Brian Steele Net Worth
- Ayushi Jaiswal New Web Series
- 6ar6ie6 No Makeup
- Camilla Araujo Leaked Porn
- Hdhub4u Thandel
Securely Connect Remote IoT P2P SSH Ubuntu Server: A Comprehensive Guide
Securely Connect Remote IoT P2P SSH Ubuntu Server: A Comprehensive Guide

Secure IoT: P2P SSH On Ubuntu - The Ultimate Guide!
